I thought people might like to see more of the process of making a mosaic. Here is a series of pictures I took while making a mosaic of a mermaid as a commission and includes personalised items relevant to the lady whose received it. I take pictures regularly for my own reference, to check the progress of the work and normally just delete them as the work moves on. But for some reason I ended up with a series of images of 'work in progress' this time. So, here they are.
Stage 1: Central motif
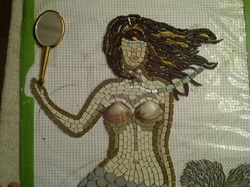
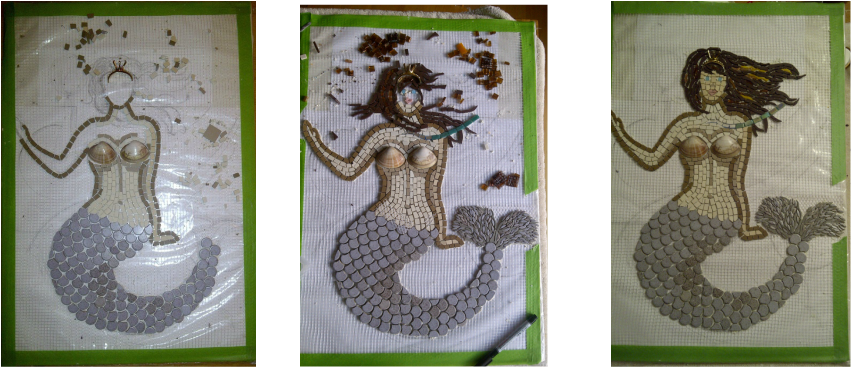
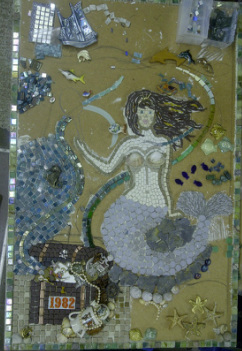
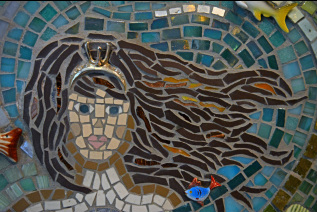
I started by drawing the mermaid, then taped the drawing to a board, covered it with clear plastic and then with a piece of mesh. The tiles are stuck to the mesh with PVA glue - they just need to be held in position at this stage as eventually the mesh with its tiles will be stuck onto the permanent base with tile adhesive. I had to think ahead to how the mermaid would fit into the overall design. So, you can see lines of 'water' swirling across her hair and chest, even though the rest of this will not be added until later. Some things - like the tiara here - are added in as the mosaic progresses. Other items are stuck on at the very end - possibly after the work has been grouted. Grout is abrasive and can damage delicate items. The pictures below show the mermaid taking shape. Finally she is complete and ready to be cut out from the mesh and moved into position on the mosaic base board (13mm MDF on this occasion). She is made up of quite small tesserae (pieces of thin, unglazed ceramic tiles in this case). It is quite traditional for the central element of a mosaic to be made up of smaller, finer elements. The little mirror she is holding in the final design has not been stuck on at this stage but its position had to be decided and drawn so that I could tile around it. It took some time to find just the right mirror - I eventually found the lovely 1950's doll's mirror on ebay. This kind of sourcing for commissions can take quite a bit of time! The mermaid's tail fin is made up of the little 'seed' shaped bits I cut from round tiles for the shape of the scales on her tail.
I started by drawing the mermaid, then taped the drawing to a board, covered it with clear plastic and then with a piece of mesh. The tiles are stuck to the mesh with PVA glue - they just need to be held in position at this stage as eventually the mesh with its tiles will be stuck onto the permanent base with tile adhesive. I had to think ahead to how the mermaid would fit into the overall design. So, you can see lines of 'water' swirling across her hair and chest, even though the rest of this will not be added until later. Some things - like the tiara here - are added in as the mosaic progresses. Other items are stuck on at the very end - possibly after the work has been grouted. Grout is abrasive and can damage delicate items. The pictures below show the mermaid taking shape. Finally she is complete and ready to be cut out from the mesh and moved into position on the mosaic base board (13mm MDF on this occasion). She is made up of quite small tesserae (pieces of thin, unglazed ceramic tiles in this case). It is quite traditional for the central element of a mosaic to be made up of smaller, finer elements. The little mirror she is holding in the final design has not been stuck on at this stage but its position had to be decided and drawn so that I could tile around it. It took some time to find just the right mirror - I eventually found the lovely 1950's doll's mirror on ebay. This kind of sourcing for commissions can take quite a bit of time! The mermaid's tail fin is made up of the little 'seed' shaped bits I cut from round tiles for the shape of the scales on her tail.
Stage 2: The Treasure Chest and the sea bed
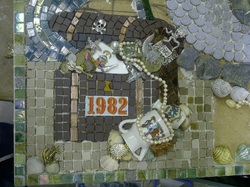
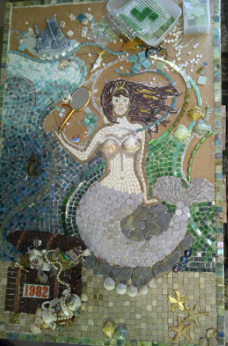
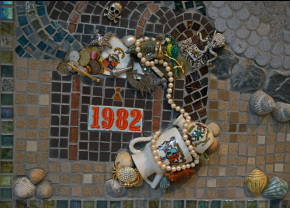
Once the figure of the mermaid was complete and stuck in position, I stuck tiles around the edge of the board to create a frame. I don't always do this, but it was right for this mosaic and I found some lovely square tiles with a mix of glass and stone in lovely shades of green. I then started work on the treasure chest at the bottom of the board. This included a whole range of personalised items and it was tricky to get everything into this small area. More ebay sourcing here! It was quite hard to work out how to position them it all and to attach them with out the glue showing. The commemorative china I've used here is very fragile and never breaks as I want it to - I have used tile cement and glue to position the china - and the pearls are hiding the joins! Once the treasure chest was done, I could start to add in the natural slate 'rocks' on which the mermaid is sitting, together with real and porcelain shells and other sea creatures including an octopus, a crab and some starfish (mainly bits of old costume jewellery).
Once the figure of the mermaid was complete and stuck in position, I stuck tiles around the edge of the board to create a frame. I don't always do this, but it was right for this mosaic and I found some lovely square tiles with a mix of glass and stone in lovely shades of green. I then started work on the treasure chest at the bottom of the board. This included a whole range of personalised items and it was tricky to get everything into this small area. More ebay sourcing here! It was quite hard to work out how to position them it all and to attach them with out the glue showing. The commemorative china I've used here is very fragile and never breaks as I want it to - I have used tile cement and glue to position the china - and the pearls are hiding the joins! Once the treasure chest was done, I could start to add in the natural slate 'rocks' on which the mermaid is sitting, together with real and porcelain shells and other sea creatures including an octopus, a crab and some starfish (mainly bits of old costume jewellery).
Stage 3: The sea, the sea (well, the background anyway)
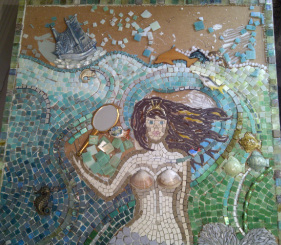
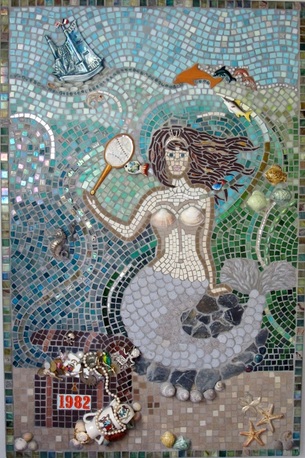
Once all the main elements - mermaid, treaure chest and rocks - were in place, I could start to fill in the background - swirls of tesserae in various colours and materials to represent the sea. This is darker at the bottom and becomes lighter further up the mosaic, towards the 'surface' of the water. Iridescent glass, dyed mother of pearl, glass smalti, pebbles and millefiore are used to create a sense of movement. Some of these are relatively expensive materials but one line can make quite an impact in the background field of a mosaic. I have also used very small amount of silver smalti (real silver foil sandwiched in layers of glass). Some mosaics artists make detailed drawing of the position of each tile, but I tend to draw a just a few lines on the board before starting the background. These are important for setting the overall shape and flow I am trying to achieve and I build the background up in lines, working freehand. The images below show the background of the sea being filled in with different shades of blue and green. The blue china boat was quite a challenge. It was a beautiful little vintage china lustreware ornament and I was determined to use it. I had to carefully cut and grind the back to make it sit fairly flat into the mosaic. I managed to do this without it breaking, but due to the shape, I was left with a big gap under the bottom edge. I hit on the idea of filling this with layers of glass pebbles to create the impression of the sea foaming around the hull of the boat as it sailed through the water! I was pleased with how this worked in the end. I used pale coloured millefiore elsewhere to create the foamy effect of the surf on the top of the water and liked the effect of the dolphins (which were old brooches from car boot sales with their pins cut off). After the earlier, more fiddley stages, it is nice to be able to lay material in long flowing lines and see the work start to progress more quickly.
Once all the main elements - mermaid, treaure chest and rocks - were in place, I could start to fill in the background - swirls of tesserae in various colours and materials to represent the sea. This is darker at the bottom and becomes lighter further up the mosaic, towards the 'surface' of the water. Iridescent glass, dyed mother of pearl, glass smalti, pebbles and millefiore are used to create a sense of movement. Some of these are relatively expensive materials but one line can make quite an impact in the background field of a mosaic. I have also used very small amount of silver smalti (real silver foil sandwiched in layers of glass). Some mosaics artists make detailed drawing of the position of each tile, but I tend to draw a just a few lines on the board before starting the background. These are important for setting the overall shape and flow I am trying to achieve and I build the background up in lines, working freehand. The images below show the background of the sea being filled in with different shades of blue and green. The blue china boat was quite a challenge. It was a beautiful little vintage china lustreware ornament and I was determined to use it. I had to carefully cut and grind the back to make it sit fairly flat into the mosaic. I managed to do this without it breaking, but due to the shape, I was left with a big gap under the bottom edge. I hit on the idea of filling this with layers of glass pebbles to create the impression of the sea foaming around the hull of the boat as it sailed through the water! I was pleased with how this worked in the end. I used pale coloured millefiore elsewhere to create the foamy effect of the surf on the top of the water and liked the effect of the dolphins (which were old brooches from car boot sales with their pins cut off). After the earlier, more fiddley stages, it is nice to be able to lay material in long flowing lines and see the work start to progress more quickly.
|

|
|
Stage 4: Grouting, painting and fixing
Once the board has been completely covered with tiles, the mosaic can be grouted. This pulls the whole piece together and makes it look 'finished'. It is quite time consuming on a mosaic like this, with lots of different elements included. Grout plays a key role in securing the mosaic but masking the delicate bits and cleaning it out of the nooks and crannies in the found objects takes ages. Grout comes in a range of colours and choosing the right one can be nerve wracking, as it can't be changed. I used a neutral grey colour here as it seemed the best choice for the colours of the tesserae. When the grout is quite set, I pour vinegar over the whole mosaic and scrub off any remaining bits of grout, glue etc. It is always very satisfying watching a lovely clean shining mosaic emerge at the end of this process. All that remains now is for the sides and back of the mosaic to be primed and painted and to decide how to fix it to the wall.
Mosaics can be surprisingly heavy - especially larger ones - this mermaid is 600mm x 900mm, so making sure it is securely hung is quite important and I'm careful to choose fixings which are appropriate for the size of the mosaic.
|
|

|
